by Sherri © Black Rose
December 13, 2007
This is what we will be making.

The results of this tutorial can be used for Incredimail,Outlook Express and Web Pages
Supplies needed:
Paint Shop Pro 8
Simple Filter here
Tube I used here
Or Tube of your choice
1- Open your tube
push shift with D on your keyboard to duplicate it.
close the original image.
2- using dropper tool,pick color you would like to use for the background
3- Resize your tube
Settings:
Resize all layers= checked
Lost aspect ratio= checked Resample using= Bicubic
Width= 300 pixels
Height= Let it self adjust
4- Edit Copy
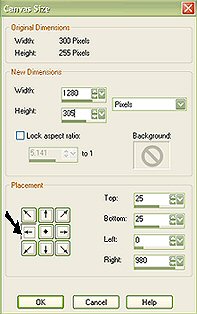
5- Image/Canvas Size
Settings:
Width: 1280
Height: Height of tube plus 50
Placement: Middle left arrow
6- Layers/New Raster Layer
7- Layers/Arrange/Send To Bottom
8-Using flood fill tool,fill with background color. Right click to fill
9-Selections/Select All
10-Edit/Paste/Paste into Selection
11-Effects/Plugins
Simple Quick Tile
12-Selections/Select None
13-Layers/New Raster Laster
14-Change your foreground color to white (#ffffff)
15-Using flood fill tool,fill with white (#ffffff)
16-On your layer pallette lower opacity to 70%
17- Effects/Simple Quick Tile
18-Layers/New Raster Layer
add your watermark,on your layer pallette lower opacity to 30%
19-Layers/Merge/Merge All (flatten)
20-File Export Jpeg Optimizer set compression value to: 20
I hope you have enjoyed this tutorial.
* A special thanks to my testers Phyllis ,Judy,Chris *
This is my own lesson and any resemblance to others are purely coincidental.
