Sparkle Tutorial
This Tutorial was done in Paint Shop Pro 8
Open a new image 200 x 200
Flood fill with #000000
Layers new Raster Layer
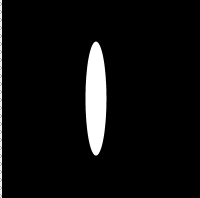
Preset shape tool shape Ellipse
On your material Palette foreground transparent
background #ffffff
Drawn an Ellipse shape like so
Effects Geometric Effects Perspective- Vertical
with the following settings:
Distortion: 100
Edge Mode Transparent

Image Flip
Effects Geometric Effects Perspective- Vertical
Same Settings

Layers Duplicate
Image Rotate Free Rotate 90 Degrees Right
Layers Duplicate

Image Rotate Free Rotate Free 45 Degrees Right
Image Resize 75 %
uncheck "all layers"
Layers Duplicate
Image Mirror

Close off the bottom layer
Layers Merge merge visible
Open Bottom Layer
Click on top layer to make it active
Paint brush with the following settings
Size: 80
Hardness: 4
Step: 25
Density: 100
Thickness: 100
Rotation: 0
Opacity: 60
Apply your paint brush in the middle of your sparkle to give it a pretty glow

Delete the bottom layer
Image resize 60 %
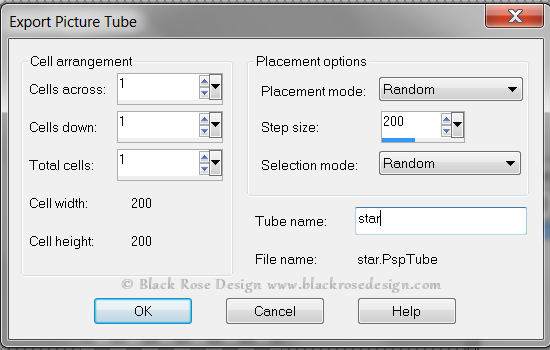
File export picture tube
Cell Arrangement
Cells Across 1
Cells Down 1
Total Cells 1
tube name (I named mine star)
Now you are ready to use your sparkle tube
I usually set my scale size to 50 when using the sparkle on something
Hope you enjoyed my tutorial :)

This tutorial was written on 2/6/11 from my own ideas and any resemblance
to any other tutorial is purely coincidental.